Starter Guide
Welcome to Space Station 13, a chaotic, one-of-a-kind multiplayer game held together by BYOND, a platform as eccentric as the game itself. While the interface might feel like an old control panel duct-taped together, and the learning curve is steeper than the station’s power draw during a meltdown, that’s all part of the charm. SS13 is an ever-shifting blend of teamwork, roleplay, and absolute mayhem, where every round invites you to dive into the madness, whether you’re patching hull breaches, managing the station’s power grid, or just trying to avoid being blamed for the latest disaster.
Yawn-Wider take an unconventional approach to the game - rather than a round-based structure similar to Among Us and similar Salem-esque games, Yawn encourages longer rounds with less severe threats, fewer unannounced antagonists, and deeper, more plentiful opportunities for Role-Play! This approach creates a more relaxed atmosphere where the focus shifts from merely surviving chaos to thriving within it, allowing players to explore the quirks of their characters, build intricate relationships, and tell collaborative stories. While certain time-limited events may have you rushing to outwit traitors or repair a station on the brink of disaster, more often than not you’ll find yourself tinkering with complex systems, inventing elaborate in-game projects, or simply sharing a drink at the bar while the chef whips up something vaguely edible.
Rules and Expectations
Yawn-Wider is a Medium-Heavy Roleplay server where staying in-character and following the rules is the name of the game. While the focus is on keeping things immersive, there’s always room for a little humor — just make sure it fits the setting. For the full rundown, check out the server rules page. Rounds tend to last up to 20 hours at most, though players can vote every four hours to wrap things up early if the chaos has run its course.
If you're a new player, it's generally a good idea to read this guide in its entirety - knowing the terms and concepts written here will help others help you, and most people really do want to help you! As a general rule, if you log in and say that you're new in OOC or Adminhelp, you'll be given a lot more leeway as you take your time to learn, and other people might even come to help you out directly in-game! As long as you listen to what people try and teach you, stay polite, and act in good faith to do your best, it's totally okay to mess up - this game's got a pretty strange learning curve, after all, and we all had to start somewhere!
Tips for New Players
If you're brand new to Space Station 13, then you're in the right place! This page will teach you all you need to know about the game itself! However, Yawn-Wider requires players stay in-character and Role-Play (RP) in order to keep the experience fun and immersive for everyone. It's totally okay to not know how to do this, or even what really is; there's a great crash-course for new and returning players alike on this very wiki at A Crash Course in Roleplaying
- Stay humble and keep an open mind - At the end of the day, everyone wants to have fun together, and it's likely that most will act in good faith to help you learn the game and improve. Do your best to always take advice and instruction in good faith - it's okay to have your own boundaries, but don't assume you know more than others and don't get upset when you're told "no".
- You are not the main character - It can be okay to get excited, especially when the spotlight is on you! Just take care you're not focusing on being the center of attention to the exclusion of all else. Everyone else deserves the "limelight" as much as you do, and in the end this is a collaborative game where the goal is to play together, not for one person to hog all the attention.
- Speak up! - Putting yourself out there, offering the invitation for others to engage with you can be very important! Don't sit back expecting people to come to you and interact with you - you'll just feel neglected when nobody reaches out. Give others something to engage with: make an introduction, ask a question, give them an opportunity to engage with you. Just don't expect it to always be taken; it's an offer, not a mandate.
- Keep Patience - Sometimes it's important to learn how people interact in a setting before inserting yourself. If you're ever unsure, it's totally alright to sit back and observe the flow of RP in a space instead of asserting your own expectations - it's always easier to welcome someone who meets a community on their ground rather than forcibly inserting themselves in the way they seem to want.
How to Join
Yawn-Wider and Space Station 13 are hosted through a games launcher and service called BYOND. The engine certainly shows its age, but it's perfectly workable, and in a lot of cases makes joining really convenient - once it's installed, you can even join the game by clicking on a web link!
Downloading the Client and Logging In
For Windows users: Download BYOND at http://www.byond.com/download/. The process of installing and running is the same as for most windows applications - run the installer executable and launch it like any other app. There's also a zip folder you can download for a portable installation that works if you don't have administrator access to your computer, or if you want to put BYOND on removable media like a USB thumb drive.
On Linux or MacOS? Some Reddit users have explained how they've managed to bet BYOND working well enough to play under WINE! Check out this link for more information: https://www.reddit.com/r/SS13/comments/gpt8gv/how_to_install_byondss13_on_linux_for_newbies/ (archive.org mirror).
You'll also need to create an account on BYOND. You'll need a valid e-mail address, but besides that it's simply a username and password. Sign up at the following link: https://secure.byond.com/?page=Join . Once you've made an account, you can log into the client you just installed.
Connecting to the Server
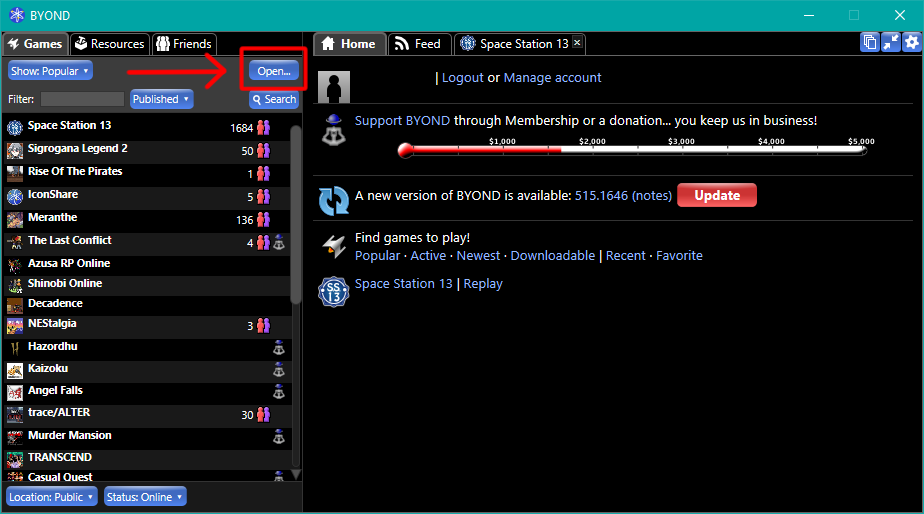
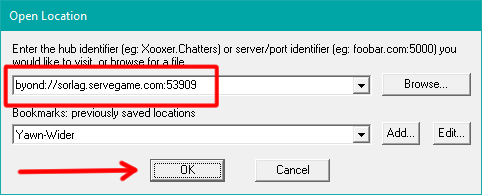
Yawn-Wider's SS13 server is open for anyone to join, but is usually unlisted on the BYOND launcher. Once BYOND is installed, you can usually click on the link at the top of the Main Page of the Wiki. If that doesn't work, you can manually input the server's address into the BYOND launcher. Start by clicking the "OPEN" button shown in the image below, then input the server address from the main page in the highlighted text box and hit "OK". You should be able to connect right away! (Keep in mind, the address shown in the text box in the screenshot may be outdated! Always use the address either from the main page of the wiki or the official discord server!)
Creating a Character
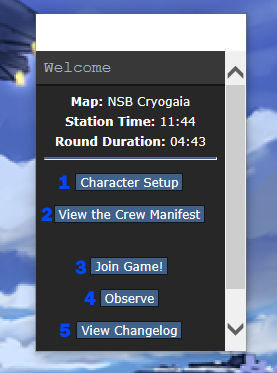
If you're familiar with the layout of SS13 you'll have no issue navigating the button layout of the character menu or the game panel and can safely skip to the next section. If you're not, though, here's what you need to know:
- Character Setup - This button opens the Character Creator menu in which you can create your character.
- View the Crew Manifest - This button shows the Crew Manifest, an in-character list of which characters are currently online and in which roles.
- Join Game! - Clicking this opens a menu that displays all the job roles you can join as during the round.
- Observe - Observe will let you join the round as an observer, whatever you see during this time is out-of-character information. If you decide to play a character, that character cannot know what you learned as an observer.
- View Changelog - Shows the changelog for the server.
- Give Feedback - Allows you to provide your input towards the server.
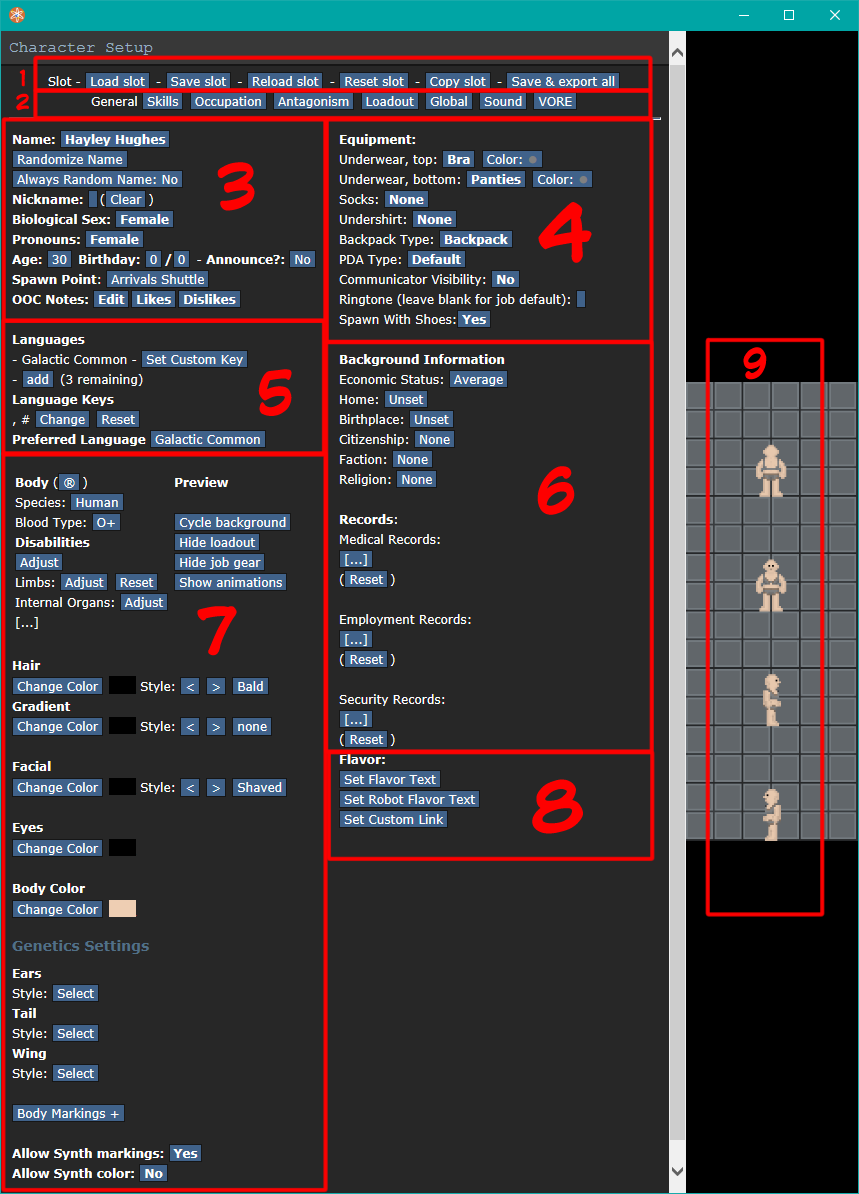
Clicking on "Character Setup" will let you build a character to play as in-game! The character creation screen is pretty complicated; there's a lot of customization that's available here, but don't feel intimidated as there's not a lot that's outright mandatory before you can play. It looks like this and has the following sections:
General Setup
- Character Saving and Loading buttons - you can have multiple characters, and these buttons allow you to switch which character you are playing/editing.
- Character Creator Tabs - each of these lets you configure a different area of your character.
- Basic Info - Name, sex, pronouns, age, et-cetera, all the basics of a person you'll be playing!
- Spawn Point - This is where your character will be starting each round! Some places may not be available, so keep that in mind.
- OOC Notes - This is a list of player (not character!) notes that indicate your preferences when role-playing. Other people should keep these in mind when interacting with you, as you should of their OOC notes. It is required to set at least some basic OOC notes before you are able to play. Just a simple sentence describing whether you are OK with 18+ RP is good enough.
- Equipment - These are the clothing items that will appear on your character. Underwear, socks, undershirt, and PDA type all affect the base sprite of your character - a "naked" character will still be wearing these even if they have no other equipment.
- Languages - It's possible to speak multiple different languages at once, by prefixing your chat messages with special control sequences called language keys. The language you speak by default will be the chosen "Preferred Language".
- Background Information and Records - Economic status determines how much money you start the round with, but otherwise this has no impact on game mechanics... but it may impact how others react to and interact with you in game!
- Body and Genetics - This determines how your body looks - you can change everything from your hair style to your actual species!
- Species - Which one you pick will change a good bit about your character, but in general it shouldn't make your character unplayable. You can find a whole list on the wiki as well as in-game.
- Blood Type - This one has a minor gameplay effect in that any medics who heal you will need to keep this in mind - it's safe to leave it as O+.
- Disabilities, Limbs, and Internal Organs - These allow you to set details on what it says on the tin for role-play reasons. While there can sometimes be benefits to having prosthetics, usually the stuff you can pick at character creation time is strictly worse or the same as biological parts at best.
- Flavor Text - This is a set of fields that others will see in-character when their character examines yours. The "general" sub-field describes what they see when they simply click on you, and the other fields give some more information if they were to examine you in more detail. It is required to set at least a basic description of your character in the "General Flavortext" field!
Skills
The next section, Skills, has no mechanical in-game effect, but is used to make sure your character isn't a Mary Sue. Your character shouldn't exceed Above Average - although keep in mind that older characters can get more skills before they hit each threshold!
Occupation
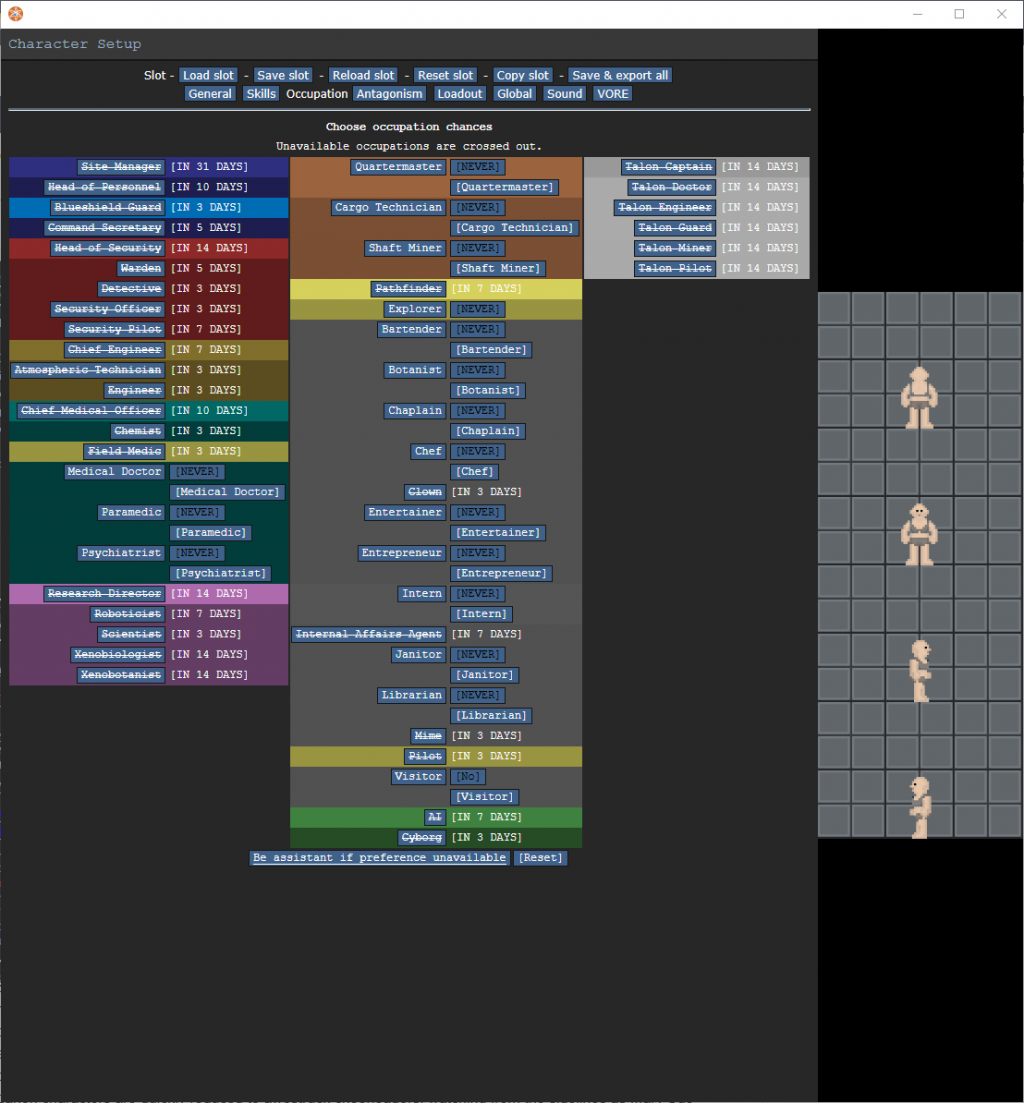
The Occupation tab determines which job your character will spawn in playing. You can set one "High" preference, and numerous lower level preferences. If your "High" preferred job isn't available when you join, you'll automatically assigned to a lower-preference job, or as an assistant if no jobs are available. Notably, the Head of Personnel role is able to change peoples' jobs in-game, so this isn't permanent. As a brand new player, it should look like the image below - note that you won't be able to play certain high-importance roles until you have some play time under your belt. This is mainly to prevent malicious actors from ruining games for everyone by spawning in as someone with high clearance and deliberately messing up the station.
Antagonism
Sometimes, there may be a round where characters are randomly selected to be antagonists, which is a topic for a different guide. Set all of these to "NO" unless you know what you're doing.
Loadout
In the loadout menu you can spend your loadout points to spawn in with items you otherwise wouldn't be able to start with. This is where you can choose clothing to start with that are removable as opposed to baked into your character image, as well as all manner of other knickknacks to use as props for your role-playing.
Global and Sound
These sections are your player settings, and affects a lot of your game and controls - it's like the "Options" menu you might find in a traditional PC game. Notably, here you can change the UI style to a dark theme, if you wish.
VORE (Perks)
The VORE tab has nothing to do with its namesake and instead means server-specific perk settings. In this panel you can set custom verbs for your character to use, what things persist between rounds, and even make up a custom species with its own perks and debuffs if that's your thing. It's also where you can configure any additional persistent modifications your character's got, such as a NIF settings.
How to Play
Once your character is done, remember to click "Save" at the top of the character menu, and your boot-up dialog should change to show, "Join Game!" Click this button to enter the round.
Basic Interface
Once you enter the round, you should see the following interface (without the red markers, those are just for explanation!):
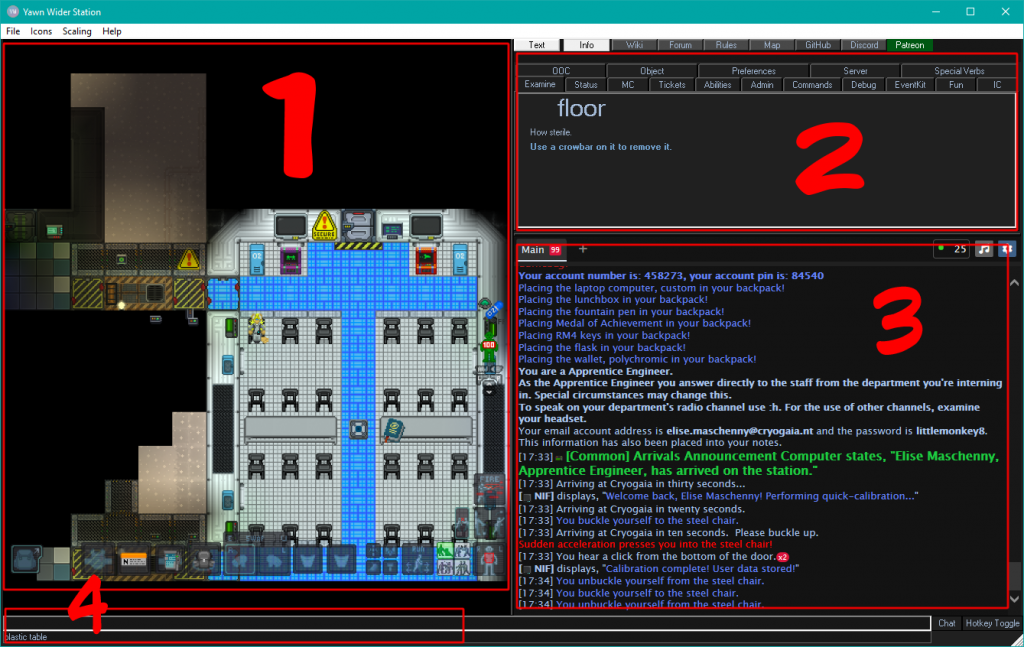
- The Game Window - this is where you'll see things happen, other characters and objects in the scene. You can see in that example that a character is already in the arrivals shuttle, along with numerous chairs, she's standing next to an intercom and an open airlock.
- The Command Window - this shows the last thing you examined by default, but the other tabs are full of clickable buttons that allow you to take various kinds of actions. Every action that can be taken by clicking in this window can also be performed by typing in the command box.
- The Chat Window - this is a chronological list of everything your character perceives. In this window, the character has just arrived to the station, and perceived numerous things.
- She has heard through the intercom to their left a loud announcement (colored in green) welcoming her to the station.
- Her NIF, a type of brain implant, projects a message only she can see.
- She sees several actions, such as herself buckling and unbuckling herself from the chair.
- The Input Line - if you type on your keyboard, chances are what you type will appear here.
- Below it is a quick-look line. Mouse-over something, and this text at the very bottom of the screen will name it.
- Anything you can click on in the Command Window can be typed into here for the same effect. You can also press space and use the arrow-keys to see suggestions and auto-complete!
Understanding the Game Window
Besides seeing the objects in play, such as chairs and people, the Game Window also shows your current equipment loadout.

- Equipment
- This may be minimized at first. To toggle these slots, click on the backpack icon in the bottom left corner.
- Here, you assign items in your hands to various parts of your body: Hat, Mask, Left and Right Ears, Glasses, Underclothing, Clothing, Gloves, Shoes, and Underclothing Storage.
- ID, Belt, and Back slots - the availability of these is based on what you might be wearing. Most of the time, the slots take what they say on the tin.
- Hand Slots - these are your left and right hands, and how you generally interact with the world.
- You can press "Swap" to swap which hand is the active (highlighted) hand.
- Clicking on something in the world or in one of your inventory slots will make you attempt to pick it up or grasp it.
- Clicking on your inventory slots or a storage item (such as a table, crate, or disposal chute) with something in your hand will cause you to try and insert or wear the item onto the thing you clicked.
- Clicking an item onto another item, or sometimes click-dragging an item from your hand onto something else, will usually "apply" one onto the other - for example using a pen to write on some paper.
- Click-Dragging a container to your character sprite will allow you to open the container without needing to pick it up, for example if you have no empty hand slots.
- Pockets - These are your underclothing (usually jumpsuit) pockets.
- Miscellaneous Menus - These allow you to configure and perform more obscure actions, such as defining vore bellies (which can be used for more than eating stuff, for example as an extra pocket, or a way to store items in a big, fluffy tail!) and crafting items from other items with your bare hands.
- Intents, Targeting, and Other Actions
- These menus allow you to toggle between running and walking, as well as which area of the body you're currently targeting. These can be useful, for example you may slip if you run over a wet floor, or you may need to target someone's eyes to blindfold them versus their mouth to gag them.
- The colored squares are intents. They are:
- Help (Green) - about staying non-violent and assisting others. Without items equipped, you’ll shake people (or yourself) awake, or perform CPR on someone who’s suffocating.
- Disarm (Blue) - a defensive intent - clicks will try to knock weapons out of people's hands or shove them to the floor. It also blocks people from moving past you through the same tile.
- Grab (Yellow) - allows you to grab people with different levels of severity. Even a passive grab is stronger than a pull, and you can upgrade your grab by clicking again and again, all the way up to strangulation. You can also land hits on grabbed targets with your free hand, and plant them onto tables just like you can with items.
- Harm (Red) - grants greater accuracy and assumes harsher action-sets with weapons. Also allows you to outright deck someone, which can be nice.
- Above the Intents is various buttons to, respectively, resist being grabbed or subdued, and also drop or throw an item in your hands.
Controls
Moving and Interacting
- Use the Arrow Keys (←↑→↓) to move around.
- There is an alternate move mode, enabled when you hit "Hotkey Toggle" (or Tab) - in this case, you move with WASD.
- Click to interact, including possibly with a held item.
- Shift-Click to inspect something.
- Right-Click to see a list of every item on a given tile.
- Control-Click to pull an object or person, as long as it isn't bolted down.
Interacting with Containers
- Click-Drag a container from the world to your character sprite to open it.
- Click a container you are holding, while your selected hand is empty to open it.
- Click on an item in a container to take it into your hand.
- Click on the container itself with an item in hand to insert that item into the container.
- This works regardless if the container is held in your hand, in the world (e.g. on a table), or part of another outfit (such as a secret coat-pocket).

Speaking and Emoting
These commands can be typed into the Command Bar at the bottom of the screen. You can hit spacebar to auto-fill the relevant command or display some suggestions.
- Say - Speak out loud, using whatever voice you have. Keyboard Shortcut: F3.
- Whisper - Speak quietly, only audible to those immediately adjacent of you.
- Me - Narrate your character's actions in an emote. Unlike "say", this is typed out in third person. Keyboard Shortcut: F4.
- OOC - Broadcast an out-of-character message to the entire server, for example to ask a question about game mechanics. Don't ever share what's happening in game on this channel.
- LOOC - Short for Local Out Of Character, this works like OOC but only broadcasts to those visible on your screen.
Here are some examples of messages as they would be typed and what they would show as in-game, with the example character "Sage Maschenny":
Say "One pisco sour please, Bartender."
[19:23] Sage Maschenny says, "One pisco sour please, Bartender."
Me sits down in the plush seat, sinking in with a happy sigh. "Ahh, this is the life!"
[19:24] Sage Maschenny sits down in the plush seat, sinking in with a happy sigh. "Ahh, this is the life!"
Note how the manually-added quotation marks allowed both an action and a voice line to coexist in the same message.
OOC "Could someone remind me how chemistry works, again?"
<ooc> Username: Could someone remind me how chemistry works, again?
Using the Radio
All characters start with an earpiece that connects them to the Common station radio frequency. Some characters will also get to talk on other channels specific to their departments. You can examine the specific radio to see what channels they can connect to. To send a message to a specific channel, prefix it with a specific symbol. Remember, this will only work if your radio can access that channel!
- ; Will send your message to the Common channel.
- :h Will send your message to your department radio directly.
- :c Will send the message to the Command Channel
- :s Will send the message to the Security Channel
- :m Will send the message to the Medical Channel
- :e Will send the message to the Engineering Channel
- :n Will send the message to the Research Channel
- :u Will send the message to the Supply Channel
- :v Will send the message to the Service Channel
- :y will send the message to the Explorers Channel
- :i Will let you talk into a nearby intercom.
- :r or :l will talk into the radio held in your right or left hand respectively.
For example:
Say "; Cleanup in the HoP Office!"
[19:44][Common] Sage Maschenny exclaims, "Cleanup in the HoP Office!"
[19:44] Sage Maschenny exclaims, "Cleanup in the HoP Office!"
Note that the message is repeated twice: Once with the [Common] tag, symbolizing it was heard over the radio, and then again with no tag, indicating the person listening heard the original speaker say it (not through any radio).
Leaving the Game
If you wish to stop playing the game for any reason, it's possible to do so at any time via the following methods:
- In-Game
- Taking the Shuttle - At the end of each round the evacuation shuttle will arrive to take everyone home. Being on this shuttle when the round ends will allow you to leave the game
- Taking the Teleporter - There is a pair of teleporters on the main floor which can be used to retire your character from the round at any time.
- Entering Cryogenic Storage - There is a cryogenic storage room on the sub-floor of the station which can be used similar to the Teleporter.
- Out of Game - If you must leave RIGHT AWAY, please use one of these channels to notify the staff so your role can be properly cleaned up and the slot opened for others. Please avoid using these methods if you can avoid it - it is much more preferable to use the Teleporter or Cryo.
- Adminhelp - Use the admin-help verb (Keyboard Shortcut: F1) to send a message to the game admins explaining that you need to go and why.
- LOOC Requests - Use the LOOC verb to ask those around you to put your unconscious body in Cryo. This is not a preferable course of action as it forces others to pause what they're doing and interrupts the flow of play.
- Discord Ticket - In emergencies, it is possible to contact the admin team with your character and user details - they can remove you from the game this way.